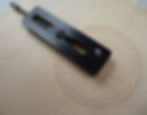
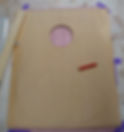
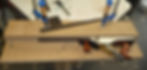
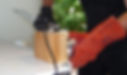
100 Photos of the construction of an acoustic folk OM guitar, built with my simplified method books.Jun 1, 20253 min readUpdated: Jun 8, 2025Guitar built with my simplified method books.Preparation of all necessary materials.Production of the template and specific mold. (Steps explained in my books)Gluing the 2 panels of the soundboard. (Templates Plans in my books)Planing the soundboard with the outer side very smooth.Cutout for the rosette with à tool easy to do.Cutting out the sound hole after gluing the rosette.A hard base coat to protect the soundboard. (Steps explained in my books)Adjusting the thickness of the soundboard on the inside.Drawing the bracing.Creation and gluing of the bracing. (Steps explained in my books)Initial bracing Completed (All Plans and Details in my Books)Gluing the 3 parts of the neckGlued Mahogany neck with reverse center.Shaping the ebony fingerboard (Details in my books)Radius of the fingerboard. ( All details in my books)Tracing the position of the frets (Tables and all the scale lengths in my books)Inserting the mother-of-pearl markers (Steps explained in my books)Manufacturing of carbon reinforcements. (You can buy them)Machining of the trussrod groove and carbon reinforcements. (Steps explained in my books)Gluing of the carbon reinforcements.Fingerboard referencing on the neck (Steps explained in my books)Outline cutout and thickness of the neck.Drilling the machine head holes into the guitar headstock. (you can do it without special tool.)Interior cutout of the head. (You can also drill)Making the neck heel. (Very precise plans in the books)Gluing the neck heel on the neck. (Steps explained in my books)Manufacturing of the neck profile. Gluing the soundboard on the neck. (Steps explained in my books)Bonding the high crossbar of the soundboard against the neck heel.Base bracing completed (Steps explained in my books)Half a guitar.Inserting the frets... (See in my new books; This operation is not done at this stage for better flatness of the finished neck)Bridge referencing. (See my books for the precise dimensions depending on the chosen scale)Gluing the bridge. (It’s still easier at this stage!)Individual adjustment of the holes of some handmade pins.Overview with bridge, pins, saddle, unglued fingerboard and headstock inlay.Tracing the sides (See my books for details of the cuts to be made)Cut sides. (Thickness 4mm)Planing the sides (See thicknesses in my books)Indian rosewood sides: One night underwater.Hot bending of the sides on the electric iron (Steps explained in my books)Gluing the tail block that connects the sides together. (Steps explained in my books)Sides glued on the soundboard. (Steps explained in my books)Planing the edges of the two parts of the back. (Details in the books)Gluing the two parts of the back.The two parts of the back glued (Thickness of the back : 6mm!)Planing the back ( See thicknesses in the books)Back finished, ready for the bracing. (Plan in the book)Gluing the bracing on the back.Gluing the back on the sides. (See détails and process with elastic in the books)Soundboard reinforcement for creating a bevel.Cutting for the bevel.Gluing the pre-heat-bent bevel.Gluing the fingerboard on the neck.Flatness of the touch with a diamond files.Fingerboard done.Oil varnishing of the soundboard and the stained bevel (See Tips in my books)All the varnishing (All the steps explained in my books)Option : Drying oil varnish with UV light.The back and its strap attachments.The head done.Tuning systems. (Tips for choosing in the books)Testing strings, handmade in Los Angeles.The electrostatic transparent pickguard.The guitar done.And when it turns, you can see it better.All the details and manufacturing tips are in my books. Read excerpts: https://bit.ly/4jA9TAb


![[⚠️ Suspicious Content] Flatness of the touch with a diamond files.](https://static.wixstatic.com/media/202eb6_ccd80f9674064d97ad0e8934d1f0e773~mv2.jpg/v1/fill/w_147,h_62,al_c,q_80,usm_0.66_1.00_0.01,blur_2,enc_avif,quality_auto/202eb6_ccd80f9674064d97ad0e8934d1f0e773~mv2.jpg)


